Eclipse Card Using Deco Foil Hello Stamp & Die

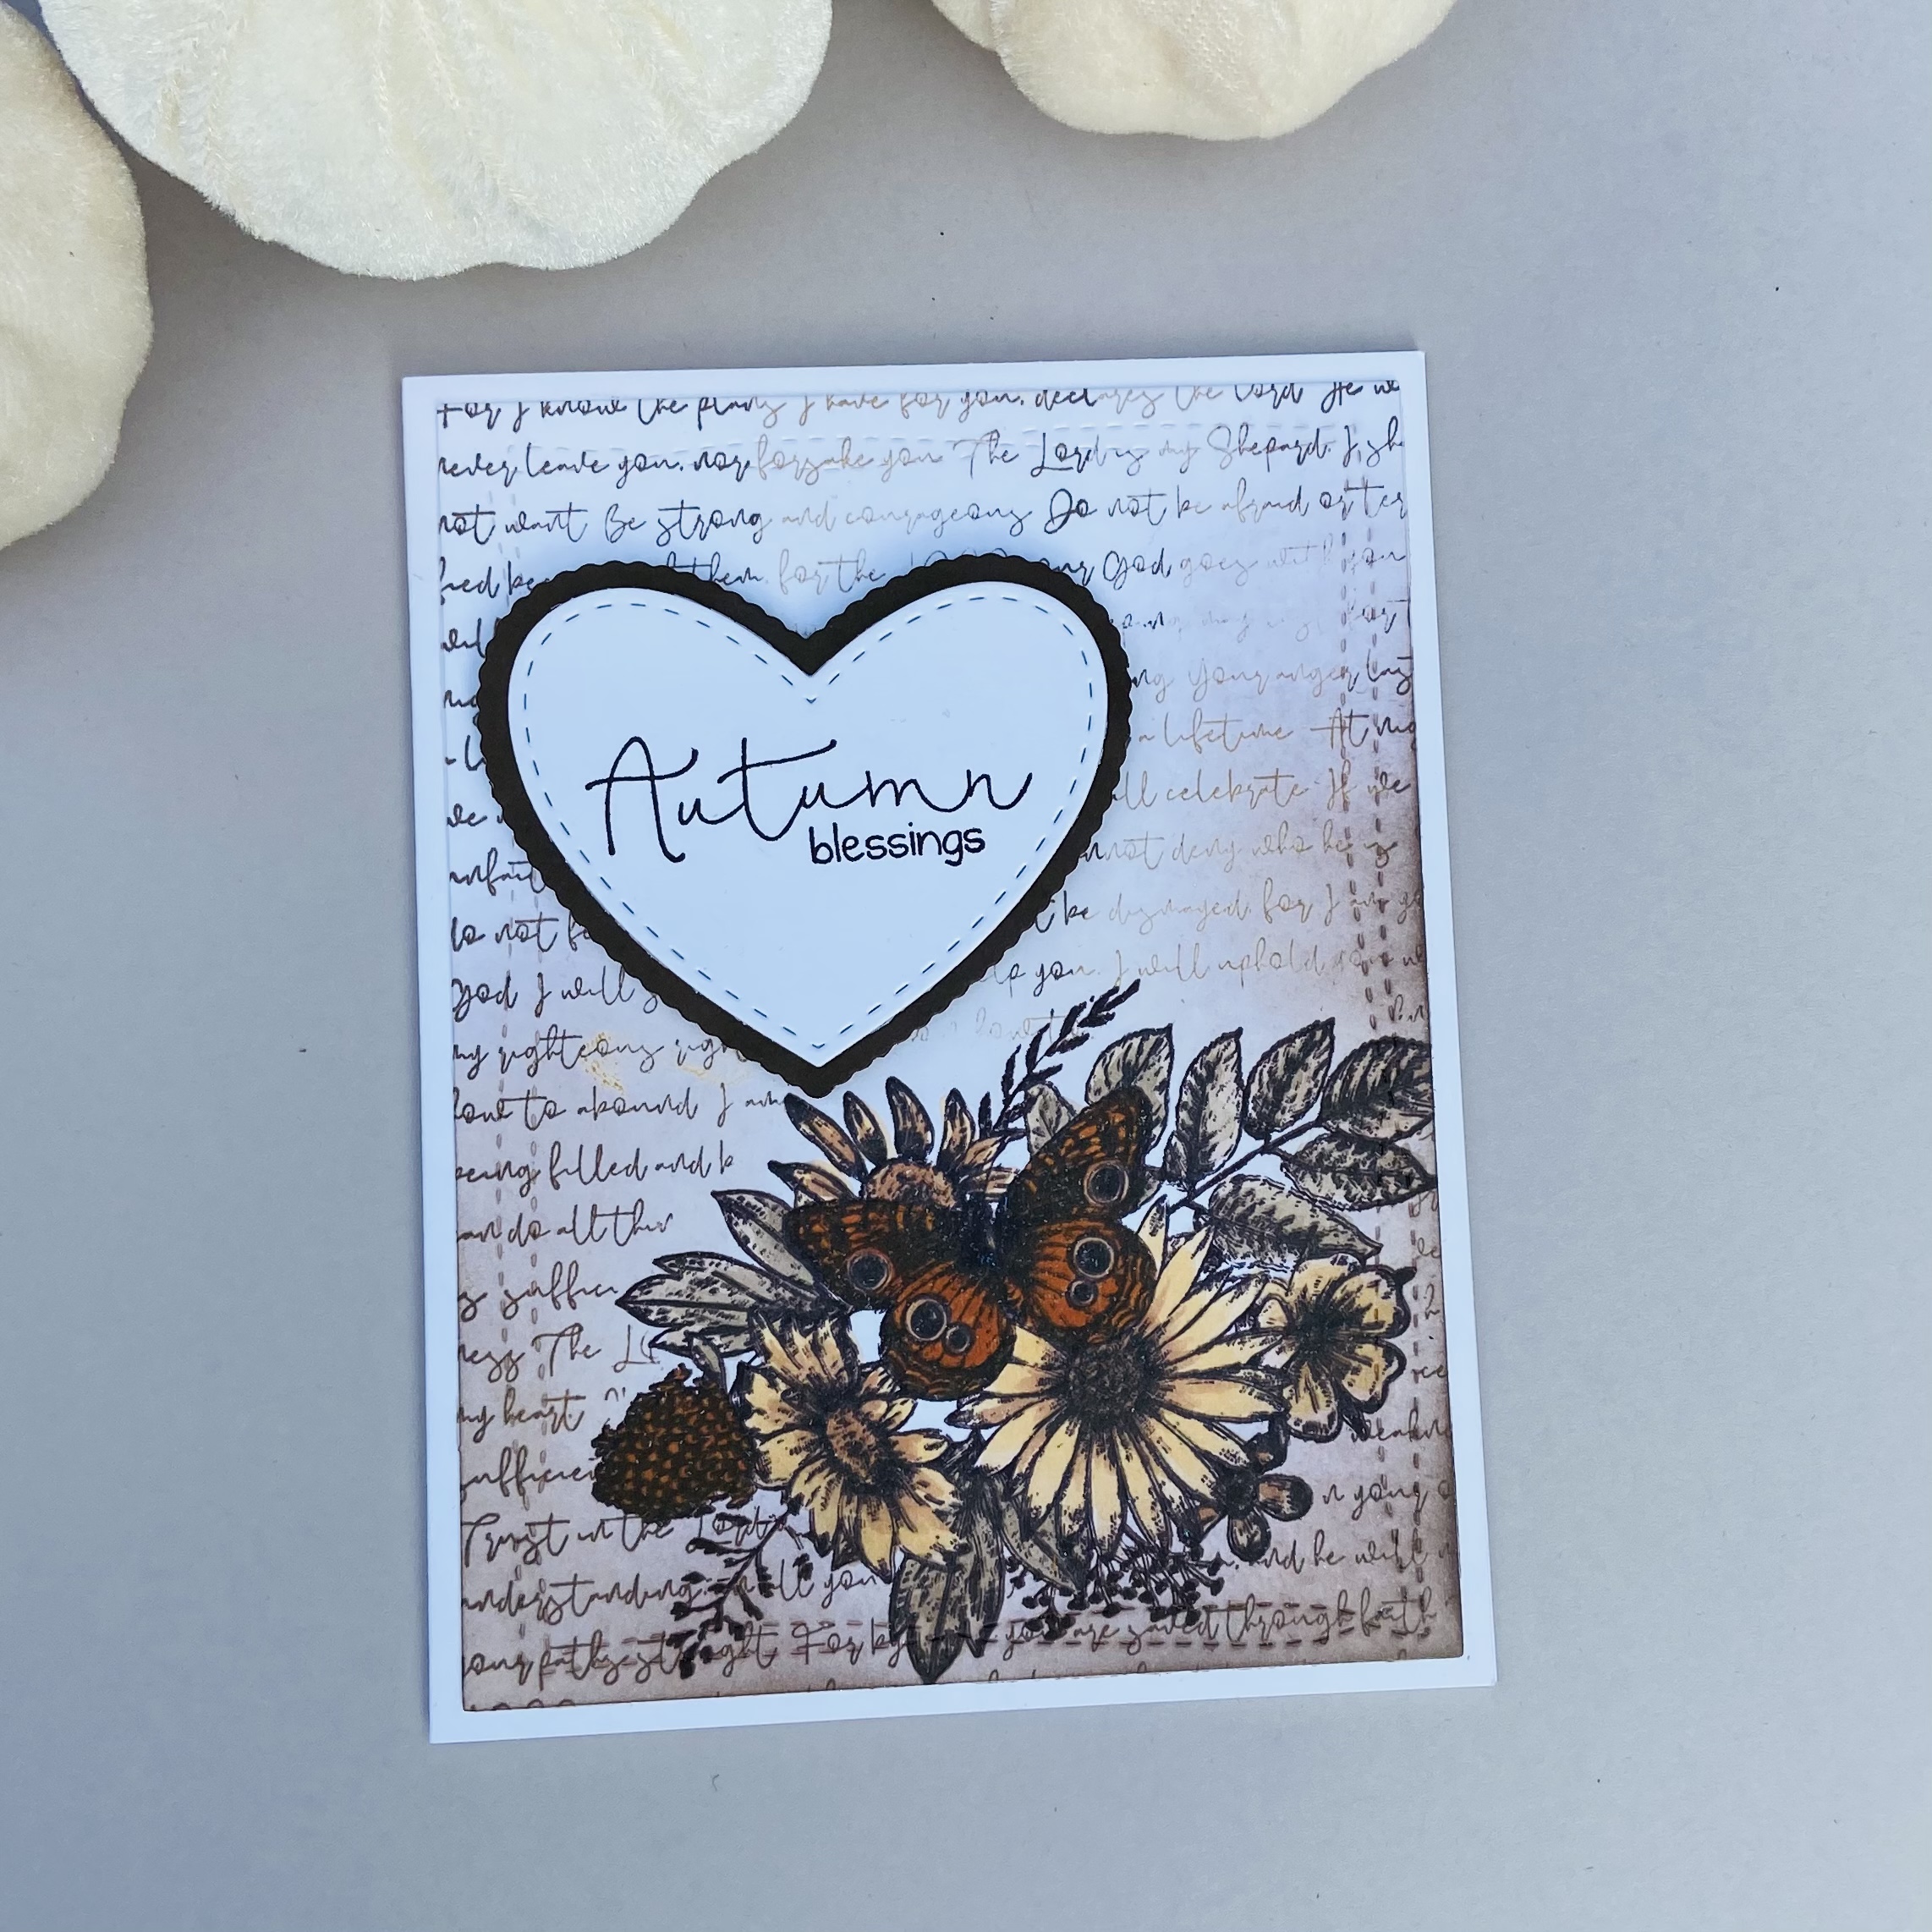
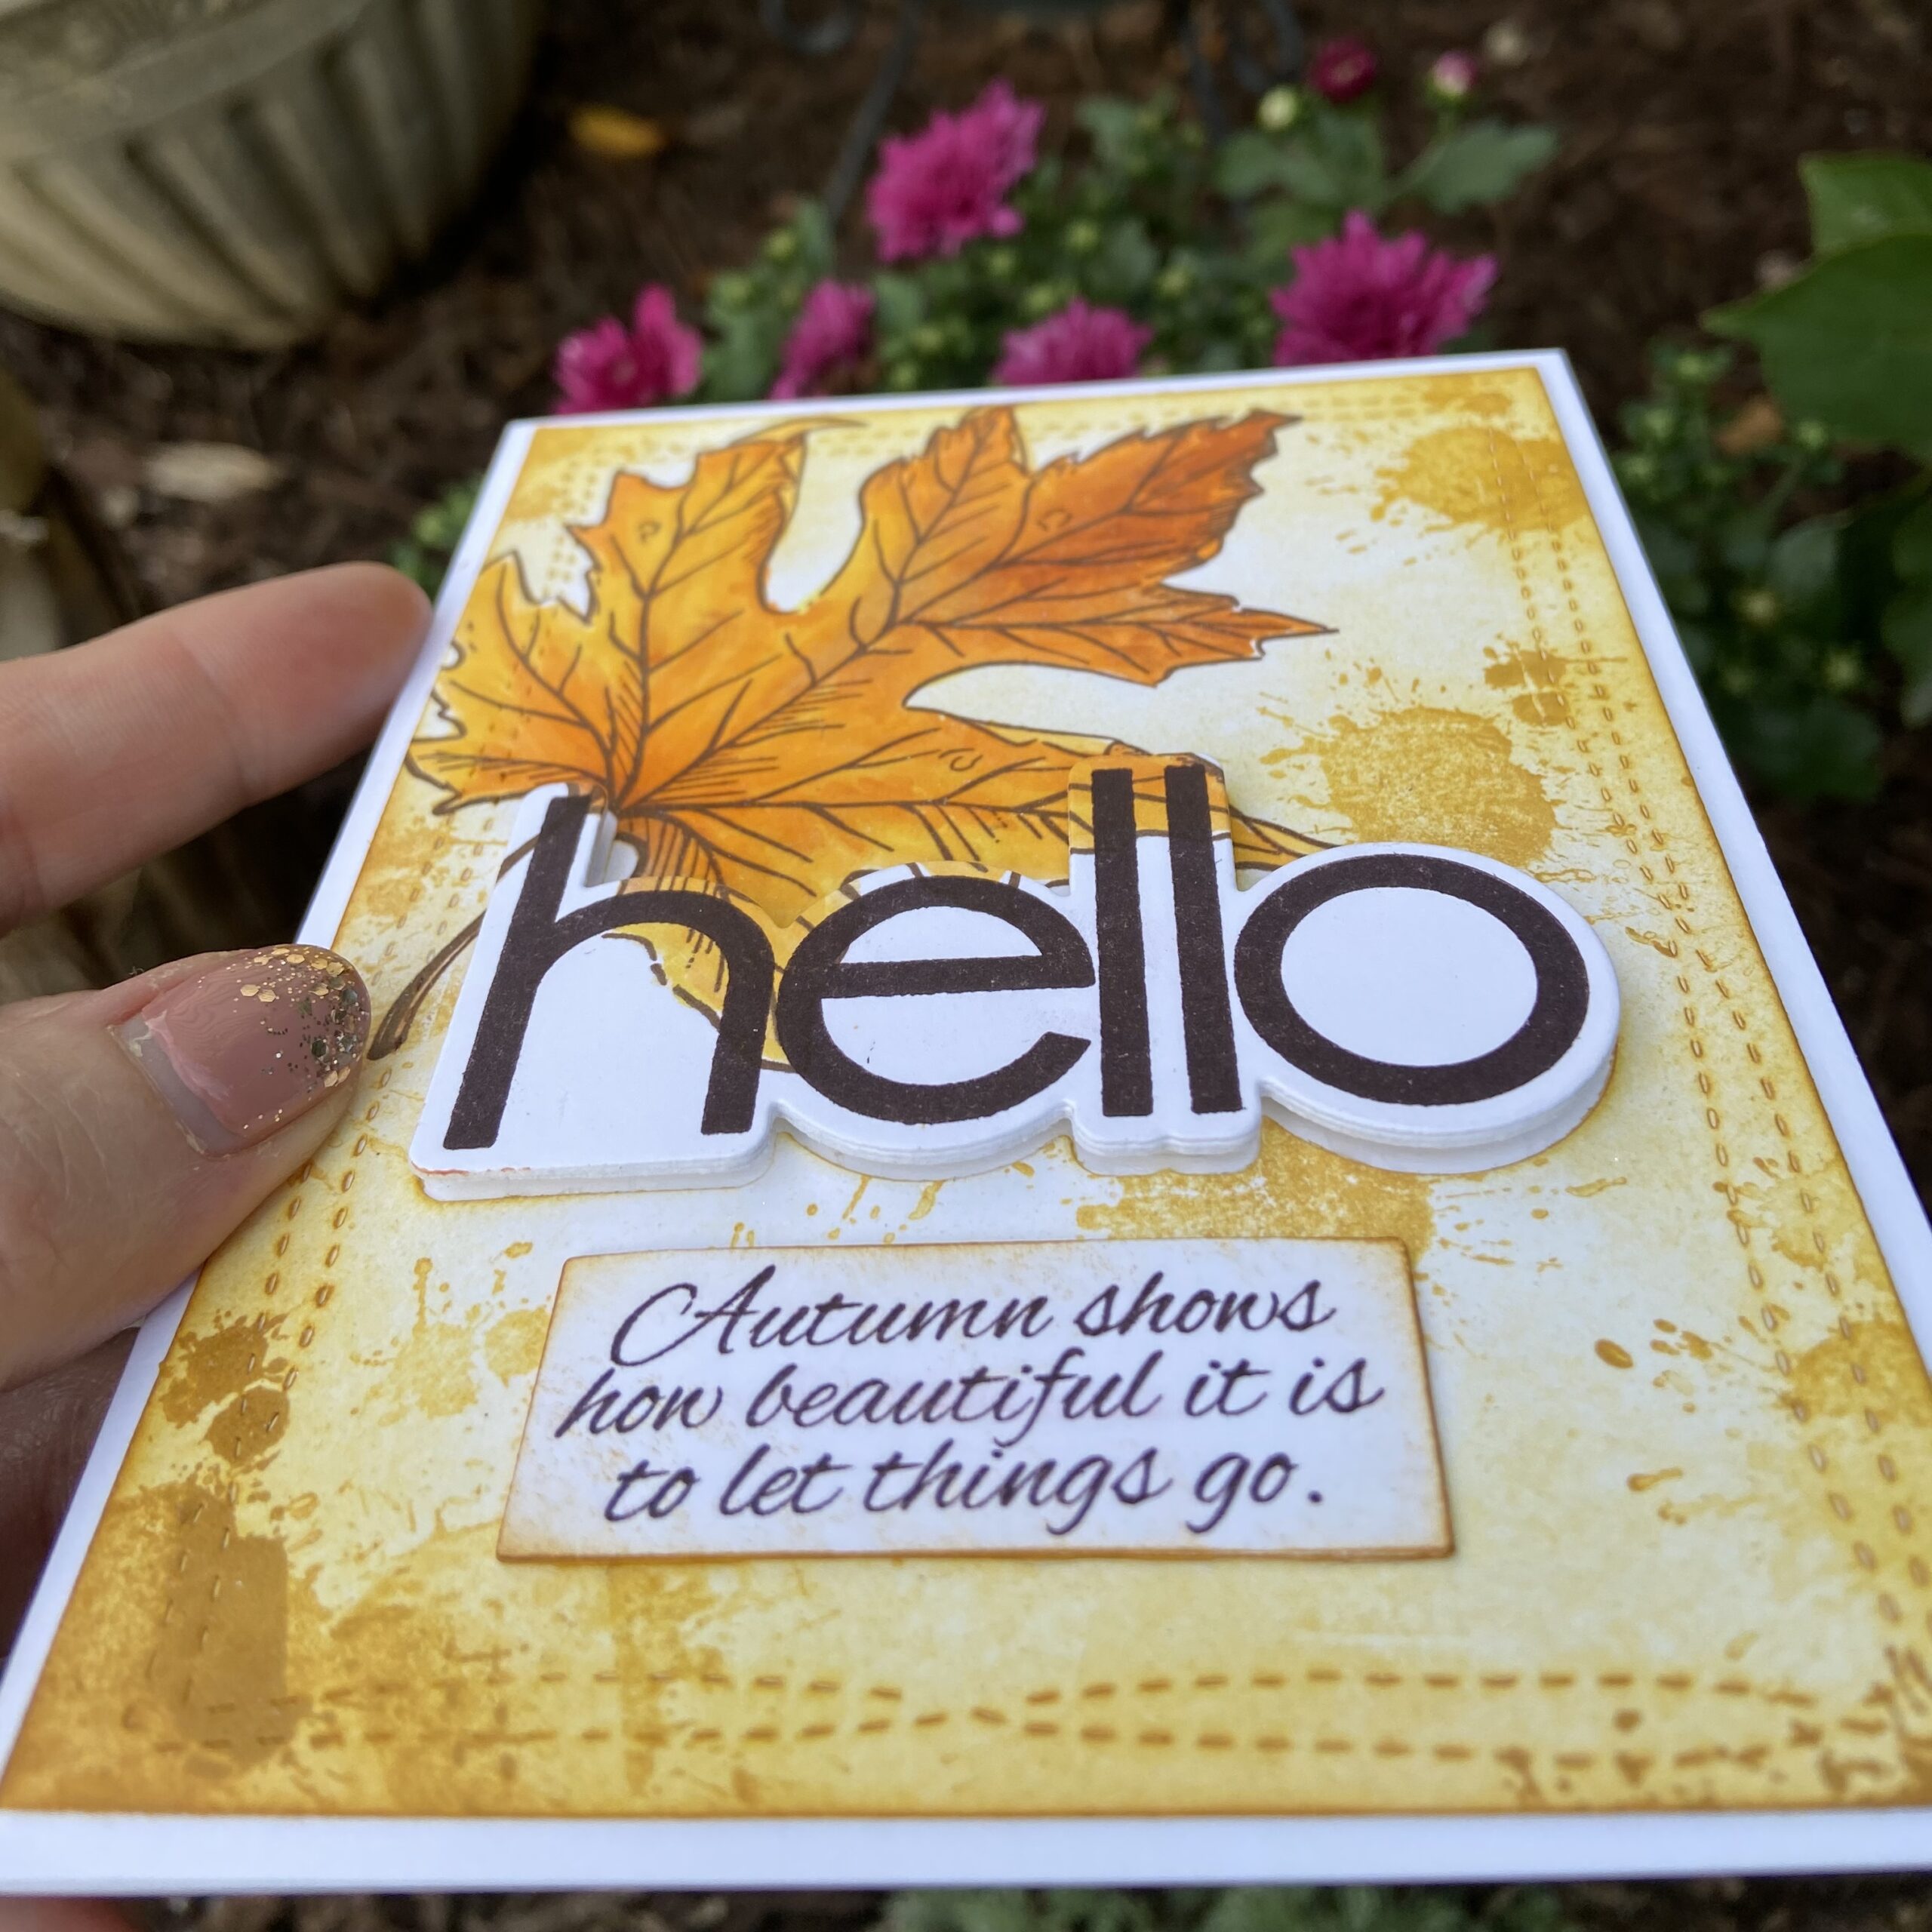
Good Morning I’m sharing an eclipse card I made using Unity Stamp Company’s Letting Go kit with the Hello stamp & Die by Thermoweb. The set has three different Hello’s I’m using the largest one for this card. I started my stamping the leaf image and Copic colored in autumn shades. Next I stamped the Hello slightly overlapping the leaf. I used the hello die to cut it out. I added some simple ink blending around the leaf panel and used the ”splotch” stamp from the Letting Go kit to add some texture. I took the leaf panel and sprayed it with Thermoweb Iridescent Ultra Fine Glitter Spray trust me this stuff is gorgeous andtakes you work to the next level. Then I glued a piece of card stock behind the leaf panel added the Hello die cut back into place with Thermoweb’s 1/8th thick foam tape. I stamped and die cut the sub sentiment die cut, lightly ink blended it and glued it directly to the panel with Thermoweb Ultra Bond glue it is my absolute favorite adhesive and use it for all my projects. Lastly I adhered it to a White card base.

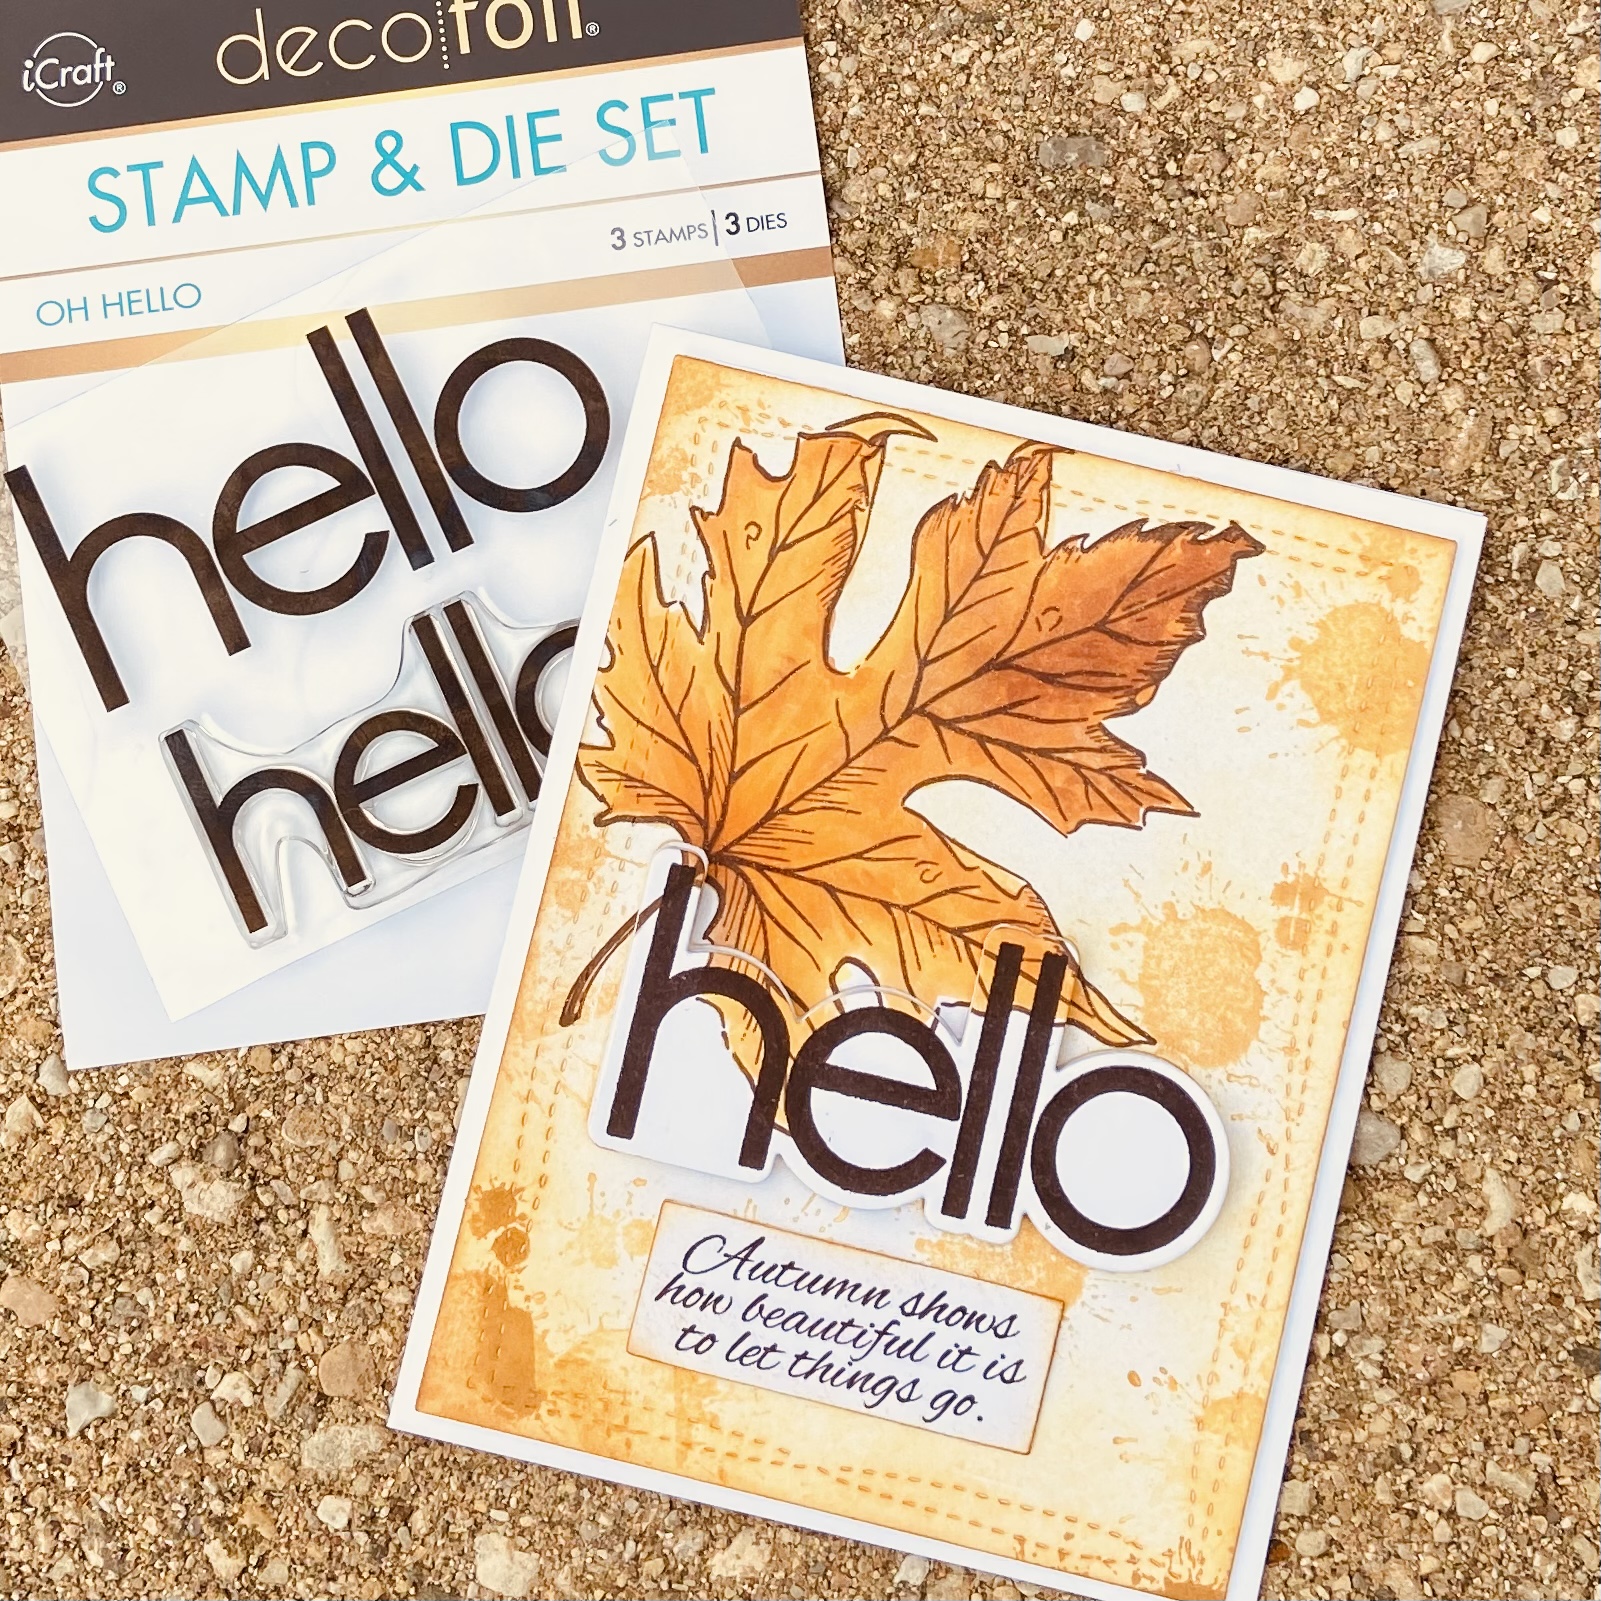
Thank you so much for stopping by. I love how you can elevate a very simple card using with this Hello Stamp and Die set.❤️

Deco Foil HELLO Stamp & Die Set

As soon as I saw this set I knew I had to have it! This was designed by my talented friend Sue Doherty she’s a card maker and it shows this set it will work with all your card making supplies. I had this Unity Stamp Company Love and Bee Loved stamp on my desk and knew it would be perfect together.

I was able to alter the ”bee YOU tiful” sentiment by simply stamping the small hello die cutting it and strategically placing over the stamped image. I love the clean and simple font of the Hello it will work with any other font.

I used a hexagon 3D embossing folder by Sizzix the heart die is also from Unity Stamp Company. i added tons of subtle sparkle with Thermoweb’s Ultra Fine Glitter Spray. I used Gold on the embossed panel and Iridescent on the heart. It’s difficult to show in photos because its so subtle and that is what makes it perfection, it seals your work gives tons of sparkle but doesn’t distort you coloring like shimmer pens do. Lastly I added Diamond Stickles to the wings of the bees.🐝

Thank you so much for stopping by have a wonerful day❤️

Growing In Unity Day Five … Fall Gifts

Today is my last day as the featured GIU Gal. Thank you so much for hanging out with me this week. I’m sharing how I make quick packaging for gift cards and how I gift cards I’ve made for friends.

The first photos show how I like to gift cards. I buy this wooden box at Dollar Tree. I spray painted the outside with rose gold paint. I add 6 envelopes to the bottom and then place 6 cards on top. The insides are blank so I add a little glassine bag with die cut sentiments for the recipient to add if they choose. I use Thermoweb tear tape on the backs so they can peel off the release paper and glue it down. Many times I also don’t add a sentiment to the front so they can also choose to add the sentiment to the front as well. I die cut the heart and frills heart and added a sentiment and taped it to the bag. Next I use a tag I’ve made from my stash and place it on top. when I’m ready to gift it I just wrap ribbon or twine around the whole box to keep everything inside.

I’m terrible at mailing cards but love giving them away and this is an easy way to package and gift your cards.

I also like to have ready made gift card holders. Here are a couple examples. The first is a simple pillow box I purchased at Hobby Lobby. I simply added a heart I die cut with an image I Copic colored. I’ll add a sentiment when I know who I’m giving it too. The tree is from the July 2021 Sentiment Kit Tree Of Love, it is one of my absolute favorites for the image and the awesome sentiments.

My final projects are gift card holders for giving coffee or tea gift cards. Its by Scrap Diva Designs she has some amazing dies and this one is my favorite! It’s big almost 6 inches tall and Unity Stamps are perfect for this.

Thank you so much for stopping by. I hope some of my ways to package your beautiful creations inspire you.

Growing In Unity Day Four … Halloween

Here’s a fun and quick way to use Unity Stamps to make projects with your kids. I made these with my nephew Noah over the past weekend. We are making 20 Halloween buckets for his Second Grade Class. I will share the finished gift when they are finished if you’d like to see it subscribe to my blog and you will be notified when I post it. I used a stamp block and Versafine Clair in Nocturne to stamp all the tags. Then we did super simple coloring Noah is seven and if we craft for more than 45 minutes he calls it work! We were able to make all these and a few more while watching Sing 2. All the images are from Unity’s Stamp Kit ” Little Boos”.

Growing In Unity Day Four … Spooky with Deco Foil

It’s Day four sharing my love of Unity but I wanted to incorporate by second love in card making and that’s Thermoweb Deco Foil with Unity Stamp Company toner card fronts. You can simply use a laminator the toner card front and foil to get these looks.

However I was at a crafty retreat with friends this spring and was taught that you can also use Thermoweb Deco Foil & Toner card fronts with a Spellbinders Glimmer Machine and the Pink Fresh Studio Solid Hot Foil Plate let me tell you its a game changer! Heather Hoffman & Lea Lawson discovered this and she has tutorials over on the Pink Fresh youtube channel. I encourage you to watch her video but here is the quick ”sandwich”: Step 1 Pink Fresh solid hot foil plate on the glimmer machine. Step 2 Deco Foil pretty side facing the hot foil plate. Step 3 Toner Card Front toner side down over the Deco Foil. Step 4 place the ”cutting plates” over the Glimmer base (I need a card stock shim in mine it depends on your die cutting machine) and run the whole thing through you dies cutting machine cranking it through slowly. the heat and pressure adhere the foil to the toner panel and its the best results I’ve ever gotten. Thanks Lea for showing me this amazing new way to use Deco Foil.

I used Gina K Inks to blend the spooky scenes the ground color is Moon Lit Fog. The first card uses Plum Punch, Wild Lilac and Eggplant. Then second & fourth card sky is Navy and Tranquil Teal. My favorite is the simplest with that Spooky sentiment the whole panel is blended with Moon Lit Fog ink and then I used a Copic (putty) to color over the ink in certain spots for interest. I would have made more but i used the last of my Wild Garden toner panels don’t worry I have more on order. It’s a gorgeous floral but paired with the Halloween images i think it looks ominous.

Unity Stamp R.I.P. stamp kit & Wild Garden Toner card front with Gold Glitter foil
Unity Stamp R.I.P. stamp kit & Wild Garden Toner card front with Silver Glitter foil
Unity Stamp R.I.P. stamp kit & Wild Garden Toner card front with Brutus Monroe Silver Sketch Foil
Unity Stamp R.I.P. stamp kit and 31 kit with Wild Garden Toner card front with Brutus Monroe Green Sketch foil

I hope you like these Spooky Halloween card with lots of sparkle and shiny foiled goodness.

Growing In Unity Day Three Butterflies

If I could only have one type of image in my stash it would be butterflies and Unity has the best butterfly stamps! Today I’m sharing some of my favorites. I used Copics to color all the images with a autumn color scheme. I find coloring butterflies really helps you practice Copic color blending its a fun way to experiment with color choices.

The images are from various KOM’s and some of my favorite butterfly kits. Sentiments are a mix from some of my favorite sentiment kits.

Here’s a couple crafty tips for you. I love foil card stock for framing my colored panels I buy Cricut foil kraft stock its available in store at Joann’s and also on Amazon. I used the Jewel tones pack for these cards. I also used Thermoweb Ultra fine Giller Spray to add shine its amazing stuff.

Who says you can’t turn a spring lilac into a fall card?

Thank you so much for stopping by for my day three as Unity’s GIU Girl Week❤️